When I tell most people that I’m going shed hunting, the standard response from the layman is, “What’s shed hunting?” They usually think I’m going shopping to purchase a shed for my back yard or something. That’s when I proceed to tell them that shed hunting is when you hike around in the hills to find antlers that have fallen off an animal’s head. Most people become fascinated with this phenomenon and some even become interested in going shed hunting themselves.
Shed hunting has been growing in popularity for years now. More and more people seem to be hitting the hills for bone. For me, what started out as a casual hobby of getting out a couple days during the spring has developed into an all out addiction of getting out as much as possible in search of brown gold. The activity has grown into more of a lifestyle that I live every spring. I think this evolution has taken place for most shed hunters. Once you find your first fresh brown antler, you’re hooked and the shediction keeps you coming back for more. It doesn’t matter how many antlers I pick up, I’m always searching for the next one.
It’s an insatiable hunger for the next brownie (brown antler).
For me shed hunting is about much more than just finding antlers. It’s become a way to better understand the animals I love to hunt. I’ve slowly learned throughout the years that in order to be a successful shed hunter, I have to understand the animals and what they are doing when they shed their antlers. The most crucial piece of information to have while you’re looking for antlers is finding where animals like to hangout when their antlers drop. Typically, where an animal has been wintering is usually where they drop. That is why I try to scout as much as possible before actually hiking around and searching for antlers. The antlers are where the animals have been.
Once you figure out where that is exactly, then you’re on your way to lucking into some bone.
Generally speaking, animals like deer, elk and moose will drop their antlers anytime from late November into May, but they don’t all drop at the same time. Moose are typically the first to lose their antlers and this can take place from around Thanksgiving all the way through February. Whereas, deer will drop from late December all the way through March. Lastly, bull elk won’t drop their antlers until around the end of February all the way up to May, just depending on the individual bull. Having this basic understanding of dropping time frames for these different species will help you get started on figuring out where a shed antler might be.
Timing is everything, especially in places that get hiked by other shed hunters.
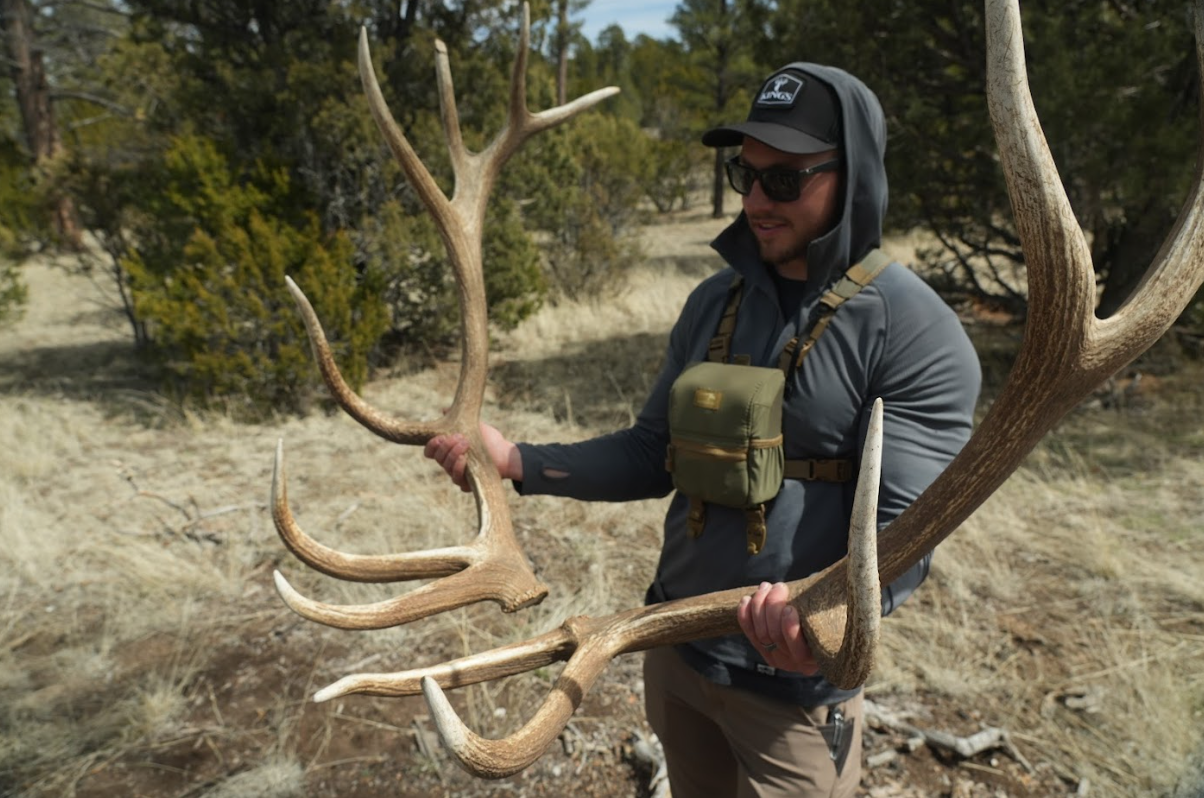
The best way to get started with shed hunting is to get equipped with the right gear. The essentials for me are a backpack, binoculars, spotting scope, tripod, boots, gaiters, trekking poles, camera and of course a GPS unit. The camera isn’t necessary for everyone, but I like to document all of my adventures, so it’s an essential for me. Most people wouldn’t deem it necessary to bring a spotting scope or a tripod either and I’ve definitely left those items behind in the past, but they’ve also come in handy many times when I’ve spotted antlers from really far out distances.
Sometimes it can really save your legs to verify what you’re looking at through a spotter, that way you’re not hiking all the way over to it just to be stick faked.
Some of the gear that I run with is a Kifaru Hoodlum pack and frame, Swarovski SLC 10x42 binoculars, a Swarovski ATX 65 spotter, Manfrotto Befree tripod, Sony A7IV camera with 24-105mm G lens, La Sportiva Trango Cube GTX boots, Peax gaiters, Leki trekking poles, and then I use OnX Maps and Google Earth on my iPhone 14 Pro as a GPS unit. On longer adventures in the backcountry, I will take my Garmin InReach Mini 2 as a mapping/communication device. If you are hiking with a buddy or multiple other people, I would recommend taking radios to communicate with each other.
Consider keeping other essential items in your backpack such as clothing layers, water, food, toilet paper, rain gear, fire starters and a first aid kit. The backpack is probably the most important piece of gear to take, because it holds mostly all of your gear and essential items. It’s also where you should strap all of your antlers when you get lucky and hit the bone zone! I’m a big fan of my Kifaru Hoodlum pack because of the strap capability. I’m able to use up to 4 straps to secure antlers to my pack, which is a big deal when you have multiple elk sheds that you don’t want shifting around while you’re hiking.
Once you have these items, you’re ready to go shed hunting.
Shed hunting is all about strategy and luck. There are a couple of different methods that I like to use while I’m shed hunting. First, get out early in the season before the animals have dropped and try to locate moose, elk and deer. A lot of the time this can be accomplished by driving around and glassing steep southern slopes where animals tend to migrate for the winter. What this does, is it lets me know where animals are and what type of terrain and elevation they’re living in. This is crucial information to have prior to actually hiking for sheds. If I’m unable to glass animals from a roadway, I will try to find good vantage points to hike to that allow me to see those melted off southern slopes where the animals might be.
The second method I like is to just get out and hike. This doesn’t come without researching an area first, via OnX Maps and Google Earth. This is usually my approach once antlers are already on the ground and finding the animals is no longer the main objective. Remember it’s all about where the animal was when they dropped their antlers. That may or may not be where the animals are at when you’re actually looking for their sheds. It really just depends on what month it is.
Timing is everything when it comes to finding sheds.
A great way to figure out if you’re hiking in the right zone is to look at the sign. If there aren’t any tracks, droppings, or rubs then you're most likely not in a good shed zone. If the hillside is torn up with rubs and looks like a barnyard from all of the tracks and droppings, then there is more than likely a shed antler laying nearby.
Each species that you’re looking for and the terrain that you’re looking for them in can have different tactics as well. Moose typically live at slightly higher elevations than deer and elk in the winter. They usually live in thicker terrain and can handle deeper snow with their long legs. The best strategy is glass for moose to find where they’ve been living. You can even sometimes glass up their tracks in the snow and follow their tracks with your binos. You might even get lucky enough to glass one up laying on top of the snow, beside some tracks. Typically they drop when there is a lot of snow on the ground, so if you can find some fresh tracks to follow in the snow, that tactic usually works best. You’ll often find many beds and even sometimes blood in the beds caused by a detached antler. That’s when you know you’re close to a moose shed.
For mule deer, the strategy is pretty similar, especially when it’s early in the year. deer tend to drop when there is still snow on the ground, but this really depends on the terrain that you’re shed hunting. If it is steep country, there’s typically more snow and glassing would be a good strategy. If you’re shed hunting flat sagebrush country, then getting out and hiking grid patterns through the sagebrush usually pays off.
My approach for finding elk sheds is almost always to glass. However, this really does depend mostly on the terrain. Steep, open/broken country, for example, would be highly conducive to glassing, whereas flat and thick country would require more of a hiking approach. Typically I like to shed hunt the steeper, more broken country because it lends itself so well to glassing. Elk sheds are usually pretty big, so they tend to stick out on open hillsides.
Elk also leave a lot of sign behind. You’ll know you’ve found a good elk shed zone when you’re seeing tracks, droppings and rubs everywhere! If you happen to see some dropped bulls in the area, that’s a sure sign that their sheds are laying nearby. Lastly, if you do happen to luck into an elk shed, make sure to give it a good effort looking for the other side. It seems like more often than not, the other side is laying somewhere close by, especially with bigger bulls.
Shed hunting is a good way to get out in the spring and shake off the old cabin fever. It’s also a great way to get your legs under you and better help prepare you for hunting season. For some of us it has transcended beyond a casual hobby of looking for antlers and has become more of a passion that we’re absolutely sick for. For those of you that haven’t ever done it, I would suggest trying it out. Just remember shed hunting requires a ton of hard work and luck. You don’t always find antlers when you go out and that’s okay. Just enjoy the process and learn something new from every hike. You’ll slowly start adding tricks to your shed hunting tactics. Once you have the right gear, then you’re all set to go prospecting for your first piece of brown gold.
By Jared Knighton
Share:
Derek Wolfe's Gear for Life
INTRODUCING A NEW HUNTER: A Short Story